Save a Life in Seconds: Infant Choking and the Gravity-Assist Cycle

A desperate parent bursts out of the crowd …
… running full-speed across the hot sand toward your tower or stand.
In their arms is an infant—silent, frantic, and turning pale. No sound is coming out.
No crying, no air movement.
When seconds count, you don't have time to second-guess your training. Every movement must be deliberate, controlled, and anatomically precise. Here is your step-by-step tactical playbook for managing an infant foreign-body airway obstruction (FBAO) using the Gravity-Assist Cycle, fully aligned with American Heart Association (AHA) Basic Life Support (BLS) standards.
1. Immediate Action & Assessment
(0–5 Seconds)
The second the parent reaches your station:
Size Up & Call for Help:
Activate your organization’s EMS protocols. Signal your tower partner or call for backup immediately to request ALS/EMS, bring the AED, and retrieve the pediatric resuscitation kit.Confirm Complete Obstruction:
Look for the signs:Inability to cry, cough, or make sound.
Ineffective, silent gasping or silent, panicked facial expressions.
Cyanosis (bluish tint around lips and skin).
Position Yourself:
Immediately sit down or drop to one knee. This provides a stable, grounded platform using your thigh to support the infant.Crucial Precaution: Never perform blind finger sweeps. If you cannot clearly see an object in the infant's mouth, sweeping blindly risks pushing the foreign object deeper into the narrow pediatric airway.
NEXT: The Gravity-Assist Cycle
(Back Slaps & Chest Thrusts)
In pediatric airway rescue, gravity is your strongest ally. By positioning the infant's head lower than their torso, gravity works alongside pressure changes to dislodge the object.
Step 1: Deliver 5 Back Slaps
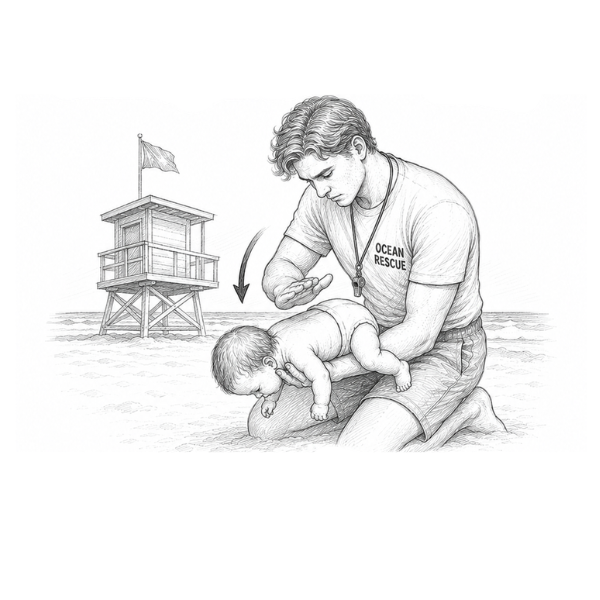
How Gravity Helps
The back slaps create a sharp spike in thoracic pressure while mechanical vibration loosens the trapped object. Because the head is down, gravity pulls the dislodged item outward toward the mouth rather than back down into the trachea.
Secure the Jaw & Neck: Support the infant’s head and jaw with one hand (place your thumb on one side of the jaw and forefinger on the other). Do not compress the soft tissue under the chin or throat.
Incline Face-Down: Rest the infant face-down along your forearm, resting your arm on your thigh for support. Ensure the infant's head is lower than their chest.
Deliver Back Slaps: Using the heel of your free hand, deliver up to 5 firm, distinct back slaps between the infant's shoulder blades.
Step 2: Deliver 5 Chest Thrusts
If the object is not dislodged after 5 back slaps:
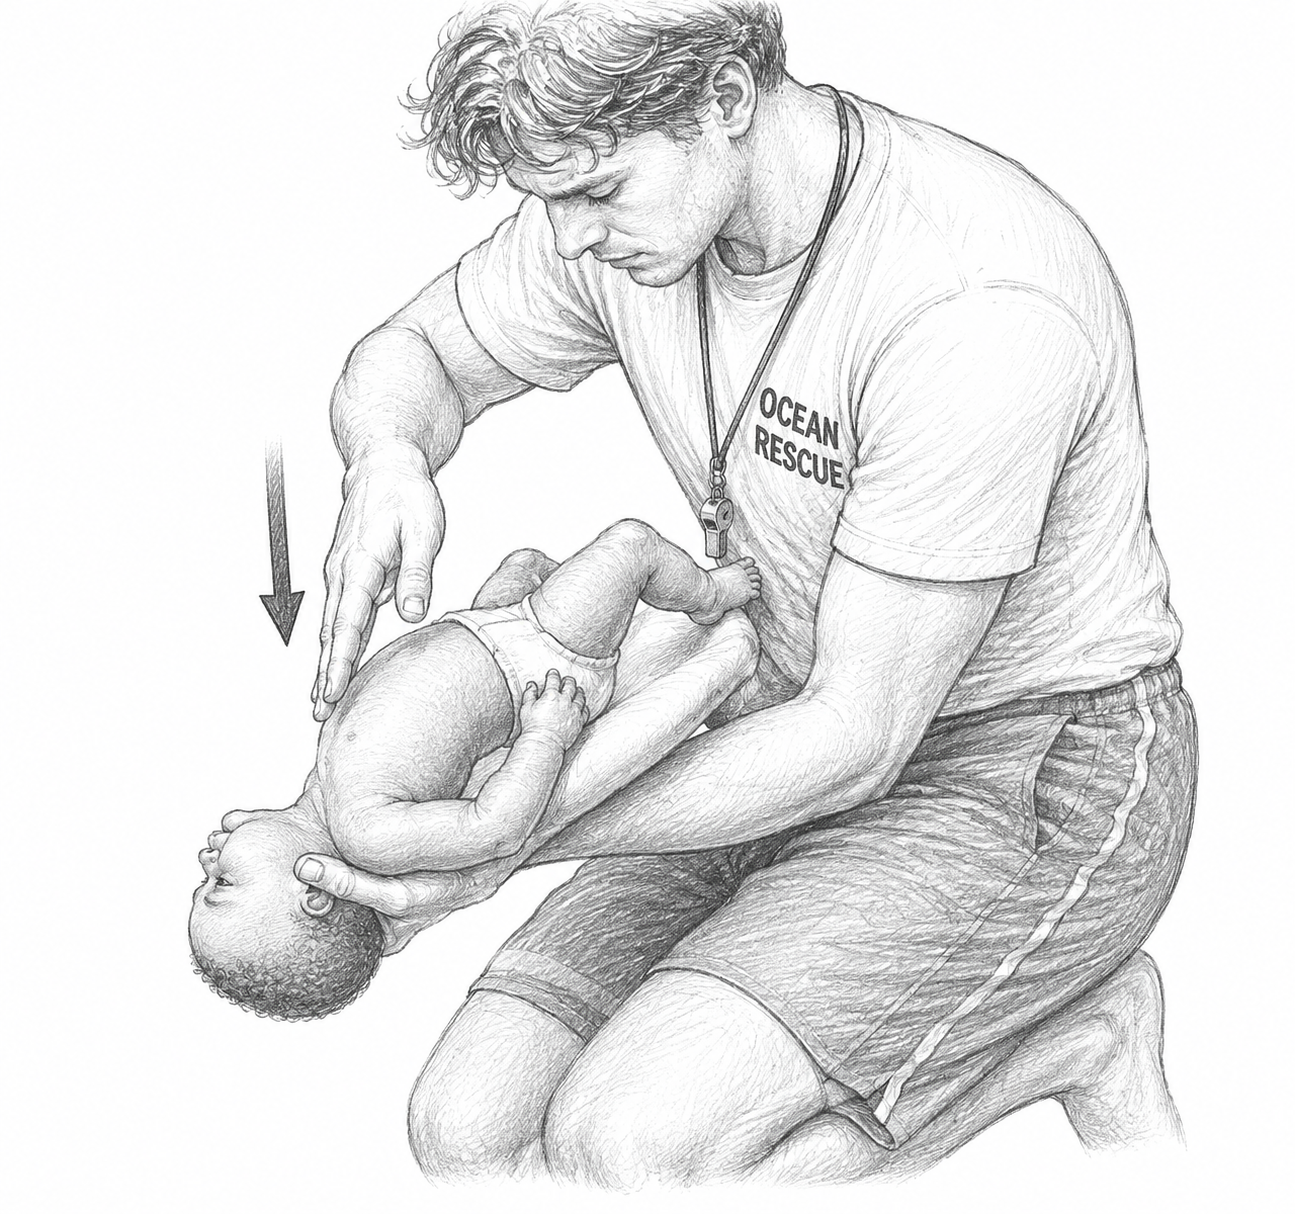
How Gravity Helps
Chest thrusts function like artificial coughs, compressing the lungs to force a surge of trapped air upward. With the head downward, the rising air column works with gravity to eject the obstruction.
Sandwich and Turn: Place your free arm along the infant’s back, cradling the back of the head with your hand. Support the infant between your two arms ("sandwich" position) and carefully flip them face-up.
Maintain Angle: Keep the infant resting along your forearm on your thigh, maintaining a head-lower-than-trunk position.
Deliver Chest Thrusts: Place two fingers in the center of the chest, on the lower half of the sternum (just below the nipple line). Deliver 5 quick, downward chest thrusts at a rate of about 1 per second, depressing the chest about 1.5 inches (4 cm).
Continue the Cycle or Transition to CPR
Repeat the cycle of 5 back slaps and 5 chest thrusts until:
The object is forcefully expelled or the infant begins to breathe/cry effectively.
The infant becomes unresponsive.
What To Do If the Infant Becomes Unresponsive?
If the infant loses consciousness at any point during the process:
Lay the infant flat on a firm, flat surface (such as a hard rescue board or clean deck).
Shout for help and ensure EMS/ALS is en route.
Begin CPR immediately: Start with 30 chest compressions (or 15 compressions if two trained rescuers are present).
Inspect the Airway Before Ventilations: Each time you open the airway to deliver 2 rescue breaths, look inside the mouth.
If you see an object: Perform a careful finger sweep to remove it.
If you DO NOT see an object: Do not perform a finger sweep. Continue with rescue breaths and CPR cycles.
Continue cycles of compressions and breaths (checking the mouth before each breath set) until air goes in or emergency responders take over.
WRAP-UP
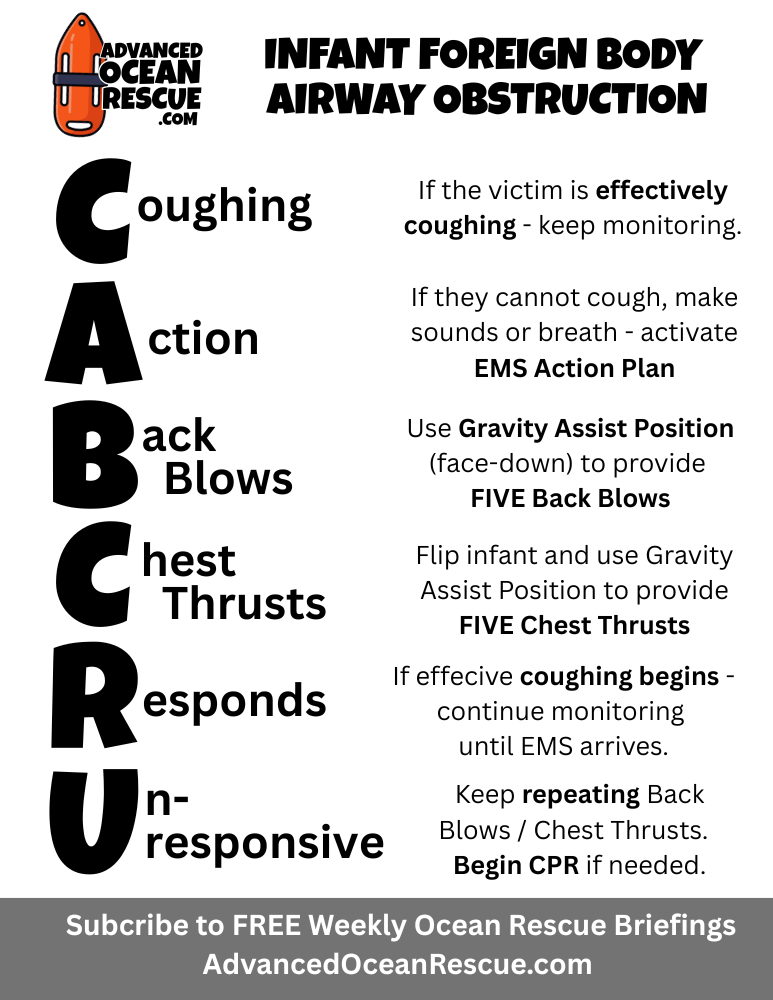
POSTER DOWNLOAD
Grap a copy of this 8” x 11” printable poster for your headquarters bulletin board.
Click the image on the left to grab the PDF.
When every second counts on the sand, instinct takes a backseat to structured training. Master the mechanics of the Gravity-Assist Cycle today—maintaining that critical head-down angle and executing precise 5-and-5 ratios—so that when a frantic parent runs up to your stand, you can react without hesitation, clear the airway, and turn a life-threatening crisis into a successful rescue.